top of page
DOUGLAS MAINA

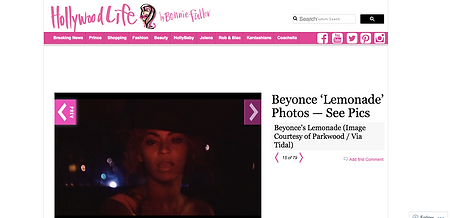
1. I wanted to do something after Beyoncé dropped her new album. I do the idea from Ella's and Slate's work. I first downloaded the images that I needed to use of the internet. I used the website Hollywood Life.


2.Like the previous exposure that I had done, I first changed the view from layers to channels so that I could be able to select my desired region. After choosing the channel blue, I proceeded to select levels on adjustments


3. You will change the levels until the image is as dark as it can be without making the background black. Then use your brush tool to just finish darkening your image. Make sure the hardness is 100% to get maximum results

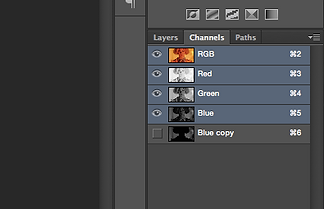

4. Having made a copy of the blue channel, you will copy paste the other channels into the copy. This will select anything other than your image. Then you can got images and select inverse. After that, create a white background for your selecting in thr layers.


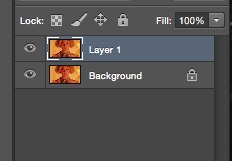
5. Following all the steps, you should have reached this point of your project. Make sure the your layer is above the background.


6. Next, you will open your first image with photoshop and select the whole off it. This is easier than selecting the parts that you are only interested in.


7. Afterwards, you will copy the layer and paste it on the first image that you started working on. The image will appear at the back but you should move it to be the first layer. then the outline will be visible.


8. You will add the vector mask to the first layer. This will make the outline have the image while the background is still white. Afterwards, you can scale and position the image inside the outline to your liking. Go to edit, transform and then scale.


9. Duplicate layer 1 and move it to the top. Then go to image and desaturate the image as it is. It will be black and white. Then change the setting to multiply so that the image before is still visible. Playing with the white and black paint, this will make some aspects pop out and other to be suttle


10. Add a vector mask to the duplicatelayer tooo. Then continue with the brush. Make sure the brsuh it at 0% hardness because if not, you will actually paint on the image.
11. You will do the same proccess for all the images you want. Make sure you save all of them in the same folder


12. Now you will start making the gif, go to file, import. load into stack and select the folder with all your images you want to use. The images will apper as many layers.
13. Open your timeline window and then make the one layer in the timeline, into several frames. This will enable it to play like a gif


14. Once you have done that, select the timings that you wnat each layer to run for. I selected 0.02 seconds to give a more flashy feeling to my gif. Then select how many times it should play. I chose forever cause why not

15.To save it, you have to choose the save for web and select asuitable image size.
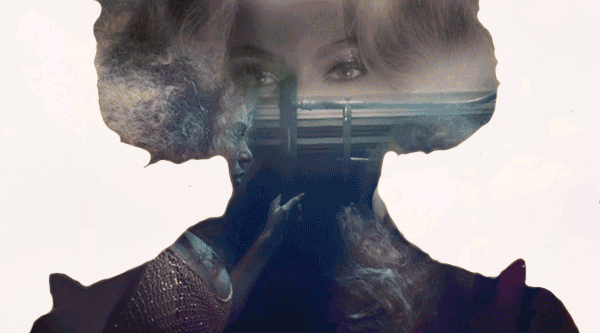
Beyoncé Lemonade gif
bottom of page